Xite Infotainment Center Owner's Manual
Access a printable PDF copy at this link: Xite Infotainment Center.pdf


Disclaimer


Features

Main Unit Display

Setup
POWER
1. Turn on the ignition ot power up the Infotainment Center. The buttons on the front of the unit light up. When the Infotainment Center is started up, it will immediately go to the last mode (memory on playback) before it was turned off.
2. In order to put the unit in standby mode, please press the Power button (PWR) for more than 2 seconds. During standby, the display will show your vehicle graphic or be off. Your preference can be set in the Settings menu (See page 10). Press the Power button again to start up again.
3. In order to turn th unit off completely remove ignition key and/or ensure any auxiliary battery power to the system is turned off.
4. Quickly pressing the Power button will mute the audio on your sytem. Press again or a volume button to resume audio.
MODE
1. Tap the Mode button to go to the Main Menu.
2. When int he Main Menu, use the touch screen to select the desired functionality.
3. You can also access the Main Menu from any screen by tapping the function icon in the top left of the current screen.
NOTE: When viewing video in full screen please touch the screen once to bring up the screen header which will display the function icon. Tap the icon to return to the Main Menu.
DIM
1. Press to manually adjust the brightness of the LCD.
-/+ VOLUME CONTROL
1. The volume level can be adjusted on the front of the Infotainment Center display by using the volume up and volume down buttons or by the steering wheel control buttons (optional).
2. The volume level can be muted completely by verify pressing the PWR button on the front of the Infotainment Center. The MUTE logo will appear the display.
FAV
1.Your Infotainment Center is equipped with a favorite source hotkey. Press the button to directly access your favorite audio source.
NAVI
1. Press the NAVI button to go to the navigation system.
2. While viewing your navigation press the NAV button to return to your active source. If you are running a navigational route, audio voice prompts will continue to be heard over your speakers according to the Navigation audio settings you have selected in the settings menu (see page 11).
3. To hear only your navigation audio voice prompts press and hold the NAVI button for 2 seconds. This will mute your current audio source until you leave the navigation screen.
EJECT
1. By pushing the EJECT button, the LCD display will move to its lowest position. When a CD/DVD is in the player, it will be ejected automatically. When the display is in the lowest position, a CD/DVD can be inserted. Please note that the display will automatically go up again after a series of beep tones unless beep tone has been turned off (see page 10).
2.1 Main Menu
The Infotainment Center is designed for simple maneuvering throughout. The screen shown on the left is the MAIN MENU screen. From here you can choose which function to access by tapping the appropriate icon on the LCD display. To return back to the Main Menu or change the active source touch the icon in the top left corner of any screen.
If the device is left idle on the Main Menu or on any system settings screen, the video will revert back to the active source (radio, etc.) after 15 seconds.
2.1.1 House Mode (Optional)
This option is only accessible when parking brake is engaged. When active, house mode sends current source audio and/or video to other areas of the coach. Control can be done from LCD screens as normal or with remote device. Please note after 1 minute of no information, the LCD screen will enter into sleep. Touch the screen to wake. House mode is exited when selected again, park brake disengaged or a power cycle is performed.
2.1.2 Aux Zone (Optional)
Allows selection of source for display on in-dash secondary monitors or house mode. A/V selections include main (mirrors main screen), DVD, Camera, Aux input, Audio only, Radio, iPod, Sirius XM.
2.2 Information Bar
The top area of the screen is the audio information bar.
This area will display the current audio source, date and time, Bluetooth connection status.
To return back to the main menu tap the audio source icon.
To view the information bar during video playback or manual camera view, touch the screen once to display. Tap the audio icon to return to the main menu.
Please see system Settings page two (2/3) (Page 11) to learn how to set up your clock.
Please see Bluetooth Operation Section 8 (page 19) to learn more on connecting and using a Bluetooth device with the infotainment Center.

3.1 General Settings
Access the System Settings by using the Settings icon in the Main Menu. The first screen shown is the first page of the system setup. The pages of the Settings menu can be changed by using the on-screen button in the top right corner. To exit the Settings menu at any time, press the Settings icon in the top left of the screen.
System Settings page one (1/3):
Tilt Position: This option allows the manual control of the tilt mechanism behind the LCD screen. Here you can set the angle of the LCD display.
Tilt Movement: The LCD panel will close during power down and return to its set position if Auto is selected.
AUX Zone: This option selects the AV source for a display connected to the AV output. The following sources can be selected. Current/DVD/CAM/NAVI/AUX/OFF. Audio only sources of Radio/SIRIUSXM/iPod may be selected. Control of most functions must be done from the main screen.
Beep Tone: Turn ON/OFF audible sound when touching the LCD screen. The Beep Tone will also provide warning of LCD display closing and other cues.
Rear View: This option selects whether a rear view camera is connected. When ON the display will automatically switch to camera mode when the reverse gear is engaged or a trigger signal is received. When no camera is connected, select OFF.
Standby Screen: Selecting ON, the Infotainment Center will display your clock when the unit is powered off by press and hold the PWR button while the vehicle remains on.
NOTE: Please use all available safety features and procedures to ensure proper driving to avoid damage and/or injury.

System Setting page two (2/3):
Language: Here the language of the User Interface can be selected (English, Spanish, French)
Auto Dim: Set to Auto, LCD will dim with your vehicle lighting, if equipped.
Temperature: Select units to display temperature (optional).
Compass Display: Select Direction or Bearing (Optional)
Time Set: This option allows setting the time in the system displays. Select Auto to allow your time to be maintained by the GPS.
Favorite Mode:
System Settings page three (3/3):
Touch Calibration: This option allows the user to calibrate the touch screen accuracy. Follow the on-screen directions step by step to complete the procedure. This procedure is only necessary when the accuracy of the touch screen is not good.
Factory Set: With this option, the Infotainment Center can be reset to factory default.
Note: All stored settings, presets, SIRIUSXM content alerts, etc., will be erased and return to original factory settings. Locked/Skipped channels, lock code in SIRIUSXM will remain unchanged.

3.2 Video Setup
By tapping the VIDEO button, the settings for the video part of the Infotainment Center can be changed.
3.2 Video Settings
Brightness: Sets the brightness level (-10-+10)
Contrast: Sets the contrast level (-10-+10). Tint: Sets the tint level (-10-+10)
Tint: Sets the color level(-10-+10)
Sharpness: Sets the sharpness level (-10-+10)
Note: The Infotainment Center has a factory default for optimal LCD settings, however the level can be adjusted to set the display according to individual taste.

3.3 Audio Setup
By touching the AUDIO button, the settings for the Audio part of the Infotainment Center can be changed.
Audio Settings page one (1/2)
Treble: Sets the treble level(-10-+10)
Mid: Sets the mid level (-10-+10)
Bass: Sets the bass level (-10-+10)
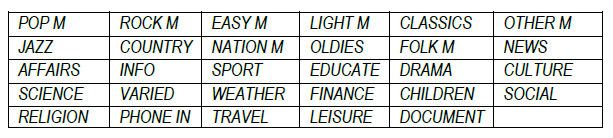
Equalizer: Here a selection can be made for the equalizer to fit a music style. The following options are available:
- ROCK
- CLASSIC
- POP
- LIVE
- JAZZ
- FLAT (normal level)
Fader: Sets the fader level between front and rear (F10-R10). 0 is the center level.
Balance: Sets the balance level between left and right (L10-R10). 0 is the center level.
Audio Settings page two (2/2)
Center/Woofer Volume: Sets the volume level for an optional center speaker when connected (-10-+10)
Loudness: Sets the volume level of speaker when connected (0-10)
NAV Volume: Sets the gain of navigation volume (-10-+10). This feature will help balance the navigation audio prompts with the system volume level according to the individual user preference.
NAV Audio Mix: This option allows setting the way of navigation voice behavior in relation to the normal audio playback. The following options are available:
1. OFF: Navigation voice will not be audible.
2. MIX: Navigation voice will mix through normal audio.
3. FULL: Normal audio will be muted on the front speakers during navigation voice instructions.

Radio Operation
Radio mode can be selected from the Main Menu by pressing the Radio icon on the LCD display. The Radio mode can be left at any time by tapping the Radio icon at the top left of the Radio screen. The radio interface contains several buttons that all have their specific purpose. Below is an explanation of each button and its functionality.
1. Tap to allow the selection between the FM and AM bands. There are 3 FM and 2 AM ranges available, all with 6 available presets.
2. Tap to allow fine tuning or manual searching for radio stations.
3. Tap to start automatic searching for the next radio station.
4. A/S means Auto Store and will store received stations in the memory. Six stations will be stored per radio band.
5. P/S means Program Scan and will go through all the frequencies stored in the memory and pauses for 10 seconds. To stay at a specific station, press the Seek button.
6. LO/DX is the default mode. When LO is selected, the sensitivity of the radio receiver is reduced so that only the strongest signals are found when searching. Tap to switch between DX and LO.
7. These six buttons can be used to switch to a radio station in the memory by tapping it once or storing a station by holding it for 2 seconds.
8. AF means Alternative Frequencies. When this function is activated, the radio will search for other frequencies on which the same station is present to offer the best reception. The AF button will blink when activated.
9. PTY means Program Type. Some radio station broadcast their program type.
When the PTY button is pressed, use the
TUNE and SEEK buttons to select the program type to search and listen to
10. TA mean Traffic Announcement and will interrupt any audio source when a traffic announcement message is relayed from a radio station supporting this functionality. When the volume is set lower than 10, a TA message will automatically raise the volume to 10.
11. REG means Regional and this functionality will support the AF functionality by searching for local broadcasts to improve reception of local radio stations.
Note: The reception and audio quality is highly dependent on the strength of the incoming signal from the radio broadcasting. When experiencing difficulties with getting a good reception, moving the vehicle to a different location can improve the audio reception. When problems persist, please contact dealer for a solution.

USB-MP3/WMA/MP4 Player Operation
USB mode can be selected from the Main Menu by tapping the USB icon on the LCD display. The USB mode can be left at any time by tapping the USB icon at the top left of the USB screen. To access and use the USB feature please contact your USB compatible device (USB stick, HD, etc.) first to the USB cable provided.
The MP3/WMA/MP4 files can be accessed from USB memory or from a CD/DVD disc.
The functions of play, pause, stop, track selection, fast forward, fast reverse, repeat play, random play, etc. are the same for MP2/WMA/MP4 and CD operation. Please see the CD player operation section for information about these functions (page 13). When a CD/DVD is inserted, the playback will start automatically. When a USB memory device is connected, the playback has to be manually started by selecting the appropriate mode in the Main Menu.
In the MP3/WMA mode the following additional functionalities are available:
Track list: The track list supports the possibility to browse through al the available data and folders. Tap stop first and the arrows next to the track list will become available to browse through the data.
 This is the icon for a folder. When a folder is selected, the track list will show the content of the selected folder. In the top of the track list the folder icon can be used to leave the current folder and return to the root.
 This is the icon for a JPEG image. The Infotainment Center also has the ability to show JPEG images (please see safety instructions). When a JPEG is selected, a slideshow will automatically be created of all the available images within a folder.
 This is the icon for a MP3 file. When a file is selected from the track list, the playback of this file will be started automatically.
 This is the icon for Movie files. When a movie file is selected, the playback will start automatically (please see safety instructions).
Note: If a file cannot be found by the Infotainment Center, please make sure that the extensions of your files are correct. For images, the only accepted format is JPEG. For music files, both MP3 and WMA files are compatible. The Infotainment Center does support the playback of MP4 movie files (with AVI extension). The compatibility and performance of the playback is highly dependent on the specifications of the source file.
CD/DVD Operation
CD/DVD mode can be selected from the Main Menu by pressing the DVD icon on the LCD display. The CD/DVD mode can be left at any time by pressing the Disc icon at the top left of the CD/DVD screen.
Disc Insert/Eject
1. Tap the EJECT button below the LCD display to get access to the CD/DVD player behind the LCD display.
2. Place the CD (label side up) into the CD/DVD slot. Push the disc in gently until the loader inserts the disc itself.
3. After inserting the disc, playback will start automatically and the CD mode's playback is shown on the display.
Functions
1. Tap to pause or start playing a track from the CD.
2. Tap to stop playback. Tap it once to pre-stop (resume when play is tapped again) and tap twice to stop completely.
3. Tap once to skip to previous track. Press and hold to reverse within a track.
4. Tap once to skip to next track. Press and hold to fast forward within a track.
5. Tap to set how the CD player should play back the available tracks. The available options are RPT ALL (normal playback), RPT 1 (repeat one track) or RPT OFF.
6. This is the random option that will allow random playback of the available tracks. Tap once to enable random playback, press again to return to normal playback.
7. Tapping the magnifying glass will bring up a keypad where the user can directly enter the track number to listen to.
The track list displayed on the right can be used to navigate through the available tracks on the CD. By using the arrows next to the list, you can scroll through all the tracks on the CD. By tapping a track on the LCD screen, playback of the selected track will start.

DVD/VCD Player Operation
(Please refer to the safety instructions in regard to video playback on page 5)
CD/DVD mode can be selected from the Main Menu by tapping the DVD icon on the LCD display. The CD/DVD mode can be left at any time by tapping the Disc icon at the top left of the CD/DVD screen.
Disc Insert/Eject
1. Tap the EJECT button below the LCD Display to get access to the CD/DVD player behind the LCD Display.
2. Place the DVD (label side up) into the CD/DVD slot. Push the disc in gently until the loader inserts the disc itself.
3. After inserting the disc, playback will start automatically and the DVD mode's playback is shown on the display.
While a DVD is playing full screen, tap the display once to see the DVD control interface. The control interface allows all the settings for DVD playback. On the bottom all normal functions are available (as with CD player operation) with the added MENU, Audio, Sub Titles, Angle and Chapter Search buttons.
1. DVD Audio track selection can be made by Tapping this icon and cycling through the audio tracks available on the DVD. Note: when a DTS audio track is selected, no audio will be available.
2. DVD's will allow several subtitles to be blended into the video file. Tap this icon to select subtitle.
3. Some DVD's support multiple angle views. Tapping this icon will switch between each available angle.
4. Tap to go to the DVD Main Menu
5. Tap for Chapter Search. A keypad will be visible on the left side of the LCD screen. Enter the chapter number to jump to.
Note: The options for these functions are dependent on the contents of the DVD.

(Please refer to the safety instructions in regard to video playback on page 5)
7.1 DVD System Settings
To access the DVD Settings in the System Settings Menu from the DVD Screen:
1. Tap the DVD icon in the top left corner of the screen to return to the Main Menu.
a. If you are watching a video full screen please tap the screen once to bring up the Icon header then perform step 1 above.
2. Select Settings icon.
3. Select DVD Set on left side.
DVD Settings page one (1/1)
Audion Language: This option sets the default audio language the DVD should start in (when available on the DVD)
Menu Language: Choose the language for menu display.
Subtitle Language: This option sets the default subtitle language the DVD should start in (when available on the DVD).
Aspect: The following options are available: Pan Scan-Wide-Letterbox
Video System: The following options are available: NTSC-PAL-AUTO

Bluetooth Operation
Bluetooth mode can be selected from the Main Menu by tapping the Bluetooth icon on the LCD display. The Bluetooth mode can be left at any time by tapping the Bluetooth icon at the top left of the Bluetooth screen.
The Infotainment Center supports Bluetooth wireless connections. It can set up a wireless link with a Bluetooth mobile phone. The unit supports a hands-free profile and A2DP (Audio Advanced Distribution Profile).
Before using the Bluetooth functionality, please make sure your mobile phone is equipped with Bluetooth and turn it on in your phone menu. Please check your mobile phone user manual for instructions using Bluetooth.
8.1 Bluetooth Setup
To access the Bluetooth Setup, select the Bluetooth icon from the Main Menu and press  found in the bottom left corner of the Bluetooth Screen.
Bluetooth Settings page one (1/1):
Connection Role: This is the profile setting for the connection role between the Infotainment Center and the mobile phone.
HF/HS: Connecting Hands-Free or Headset (Default setting)
AV: Connecting for only playing audio files from the mobile phone
HF/HS + AV: connection both HF/HS and AV
Auto Connect: This enables the Infotainment Center to search and connect with any paired mobile phones after power up. You will see the  icon flashing in the top right hand corner while searching for devices when enabled.
Voice Tuning: This enables fine tuning of the outgoing voice audio.
Bluetooth Gain: Setting the volume level of Bluetooth operatation (-10-+10)
MIC Gain: Setting the sensitivity level of the microphone (1-8)
PIN Code: Customizable PIN code for mobile phone connection.

8.2 Pairing your Phone
To pair your compatible mobile phone to the Infotainment Center please have your user manual for your mobile phone and follow the instructions below:
1. Go to the Bluetooth screen by selecting the Bluetooth icon from the Main Menu
2. When Bluetooth is accessed for the first time, it will show NO CONNECTION on the screen.
Tap  to access the device list.
3. Tap  to start pairing mode.
4. Follow the pairing instructions for your mobile phone.
5. If completed successfully your phone will be shown in the device list.
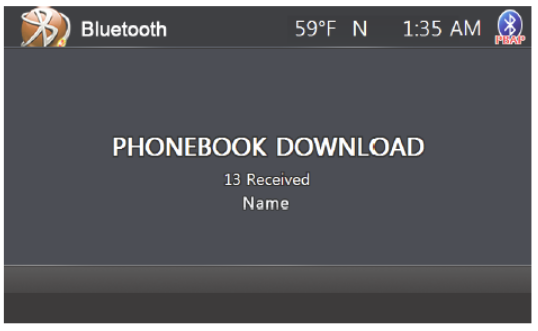
6. If your mobile phone supports phonebook transfer, tap  . If the system does not automatically begin transfer please see your mobile phone user manual for further instructions.
The phones are shown by their unique addresses and if the phone supports it, the mobile phone's name.
Notes on Pairing:
1. If PAIR START appears temporarily, the pairing cannot start due to an active connection. Please disconnect any active mobile phones.
2. Only when PAIRING is displayed, the Infotainment Center becomes visible for mobile phones. Use your mobile phone to search for the Infotainment Center to connect to your mobile phone.
3. When connecting, the Infotainment Center will identify itself to your phone as "XSG2". The mobile phone will ask for a PIN code. The factory default code is "0 0 0 0" (this code can be changed, see Bluetooth settings). Once the mobile phone confirms that it has established a new paired connection, authorize the Infotainment Center to make an automatic connecting.
4. When the pairing procedure is completed successfully, the display will show PAIR OK. When PAIR FAIL appears on the display, repeat the pairing procedure.
5. Once the Bluetooth pairing is completed between your mobile phone and the Infotainment Center, both will be automatically recognized and the connection can be made automatically from that moment on.
6. If there are more mobile phones paired to the Infotainment Center and within range, the connecting priority is given to the last paired mobile phone.
7. In case that pairing fails after each attempt, please turn off both your mobile phone and the Infotainment Center. Turn both on again and repeat the procedure as above.

Notes on Phonebook Feature;
1. Phonebook function is matched with OPP (Object Push Profile) in user's mobile phone.
2. To update changes to the phonebook of a paired mobile phone, you must perform the phonebook download step again.
3. The contents in incoming call list, outgoing call list, and missed call list will be only call lists when system and mobile phone are paired.
4. Number of paired devices: max. 4 sets
5. Number of phonebook lists: names - max. 500, phone numbers - mas. 1900.
6. Incoming call list, outgoing call list, missed call list: max. 20 numbers per category
7. Letters of name: max. 26 letters (English)
8. Length of numbers: man. 20 numbers
Note: Performance of Bluetooth is highly dependent on the capabilities of the mobile phone in use. To maintain good connectivity ensure that your mobile phone's battery is adequately charged.
8.3 Incoming Calls
While the mobile phone is connected, incoming calls will be handled by the Infotainment Center. When an incoming call is present, the LCD display will switch to Bluetooth mode and show the phone number (when available) front he person calling. Under the phone number, the buttons Accept and Reject are present.
 Tap to accept the call. The Infotainment Center will accept the call and give the call audio over the normal car speakers.
 Tap to reject the call. The Infotainment Center will close the connection and return to the previous operation. (Some phones may not support the reject mode.)
When a call is ended, the Infotainment Center will switch back to its last mode. This will be done automatically after 5 seconds or can be done manually by tapping the NOW button. If CANCEL is pressed, the Bluetooth mode will remain active.
8.4 Outgoing Calls
Direct Dialing
To place an outgoing call, the screen will show a numeric pad where the phone number can be entered manually.
 Tap the Backspace button if you have made a dialing error.
 Tap the Redial button to redial the last number called with the mobile phone.
Voice Dialing
 When the mobile phone also supports voice dialing, a Voice Dial button will also be available. The Infotainment Center will display Voice Dial on the screen and await a voice command when tapped.
Note: The Voice Dial functionality is highly dependent on the connected mobile phone. Please read the movie phone's user manual for instructions.

Phonebook Dialing
Calls can be made by accessing your downloaded phonebook.
1. Tap  to access your Phonebook.
2. Tap the contact name on the right you wish to call.
3. Tap the number you wish to call.
4. Tap the green phone icon.
Note: Outgoing calls can also be made on the mobile phone itself. The Infotainment Center will still take over the outgoing call and switch to hands-free mode.
8.5 AV (A2DP Audio Playback over Bluetooth)
Some mobile phones also support the functionality of A2DP (Audio transfer protocol). The Infotainment Center uses this protocol to find audio files on the mobile phone and play the audio over the normal speakers. Some phones will also support the audio playback of certain apps, like internet radio, through the XSG2NA.
Tab AV in the standard Bluetooth screen. The screen will change to a normal playback screen with the standard functionality:
- play or pause
- stop
- previous track
- next track
Note: The A2DP functionality is highly dependent on the mobile phone used. For information on this protocol and its functions, please read the user manual of the mobile phone.

SiriusXM Satellite Radio

Only SiriusXM brings you more of what you love to listen to, all in one place. Get over 140 channels, including commercial-free music plus the best sports, news, talk, comedy and entertainment. Welcome to the world of satellite radio. A SiriusXM Vehicle Tuner and Subscription are required. For mor information, visit www.siriusxm.com. When a SiriusXM Vehicle Connect Tuner is connected, press the SiriusXM icon in the main menu. SiriusXM mode can be left any time by pressing the SiriusXM icon at the top left of the screen. This section describes the features and functions of the SiriusXM Satellite Radio. Before using the optional SiriusXM Satellite radio, you need to subscribe to the SIRIUSXM service either by phone or via the Internet (see Subscribing to SIRIUSXM Satellite Radio).
9.1 Subscribing to SiriusXM Satellite Radio
To subscribe to the SiriusXM Satellite Radio service, follow these steps:
1. After installing your SiriusXM Connect Vehicle Tuner and antenna, power on your radio and select SiriusXM mode. You should be able to hear the SiriusXM preview channel on Channel 1. If you don't hear the Preview channel, make sure your tuner is installed correctly as described in the tuner Installation Guide.
2. After you can hear the Preview channel, tune to Channel 0 to find the Radio ID of your tuner.
You will need this number to activate your subscription. Write the number down for reference.
Note that the SiriusXM Radio ID does not include the letters I, O, S or F.
- Visit www.siriusxm.com/activatenow
- Call SiriusXM Listener Care at 1-866-635-2349
For Canadian Subscriptions, please contact:
- Visit www.siriusxm.ca/activatexm
- Call XM customer Care at 1-877-438-967
As part of the activation process, the SiriusXM satellites will send an activation message to your tuner. When your radio detects that the tuner has received the activation message, your radio will display. "Subscription Updated". Once subscribed, you can tune to channels in your subscription plan. Note, the activation process usually takes 10 to 15 minutes, but may take up to an hour. Your radio will need to be powered on an receiving the SiriusXM signal to receive the activation message.

1. Band/Scan Indication
2. Channel and Content Information
3. Function Buttons
4. Presets
5. Page Scroll
6. Channel Guide
7. Signal Strength
8. Lock Mode
9. Category Mode
10. Channel Number
9.2 Operating Sirius XM Satellite Radio
The display for the SiriusXM mode is laid out to provide you with the required information and icons to allow maximum enjoyment of your SiriusXM subscription.
3. Pressing the "FUNC" button will toggle between function buttons CAT, CAT+, SCAN, P.DEL will change to ALERT, ALERT+, SKIP, LOCK. See below to learn more about each function.
11. 
9.3 Tuning to a channel
 Press once to tune to the next/previous channel. Press and hold to rapid tune. To page through a channel or category list press
  found to the right of the channel list
1. The Infotainment Center will store up to 18 preset stations of your choice. Press BAND to go to the next series of preset channels (3 Bands X 6 Presets).
These preset buttons allow direct tuning to your favorite stored channels.
1. Press a preset button once to tune to a stored channel.
2. Press and hold a preset button for 2 seconds to store a new channel preset.
3. To delete a preset press and hold P. Del for 2 seconds
2. Press DIRECT to bring up keypad to allow for Direct Channel Tuning.
1. Enter the channel number and press 
3. Press CAT to display All channels Mode or Category Browsing on channel list which is found on right side of screen. Category Browsing allows you to directly enter a Category to enter by selecting it form the list. If you do not see CAT button press FUNC key to make that option available.
4. Press Cat+ to add the current channel to your own virtual category "My Favorites". Once the first channel is stored the "My Favorites" Category can be found in the Category list.
5. SCAN will play 5 seconds of the next channel in your current channel list and proceed through subsequent channels 5 seconds each. To stop and Scan press SCAN, select channel from list, preset or other channel tuning options.

9.4 Parental Control Channel Locking and Channel Skipping
The SiriusXM Parental Control feature allows you to control access to channels that you consider inappropriate for some listeners. When enabled, the Parental Control feature requires you to enter a lock code to tune to the locked channels. Information on setting up the lock code, setting up the channels to be locked, and the method to access the locked channels are described below.
9.4.1 Lock Code
The Infotainment Center is delivered with a default Lock Code of "0000". Please see page 24 to learn how to edit your lock code. Please remember your lock code. It will be required to access locked channels or change the Mature Channel Lock setting. If you have forgotten your lock code and require a reset please see page 41 for support contact information.
1. 9.4.2 Lock Mode/Unlock Mode
Your Infotainment Center will automatically start up with SiriusXM in Lock mode. This will prevent the accidental turning to channels that have been automatically locked under the optional Mature Channel Locking feature or user applied locked channels.
To enter Unlock Mode:
1. Press and Hold LOCK Button for 2 seconds. When the keypad is displayed input your lock code and press enter or,
2. Tune to a locked channel. When the keypad is displayed input your lock code and press enter.
Once you have successfully entered the lock code SiriusXM will remain in Unlocked mode until the Infotainment Center is turned off, put into standby mode or you repeat step one above.
9.4.3 Mature Channel Locking
The Infotainment Center is set to default the Mature Channel Locking to OFF. I turned on this feature will automatically lock all mature themed channels determined by SiriusXM. If enabled, tuning t these channels requires you to enter your lock code first and enter Unlocked Mode.
Please see page 32 to learn how to tun Mature Channel Locking to ON.
2. 9.4.4 Channel Locking
Channels can be locked to restrict access to certain channels.
To lock a channel:
1. Tune to the channel you wish to lock
2. Press Lock to bring up keypad.
3. Enter your lock code and press enter
4. Tune to another channel
5. Channel is now locked
To remove a user defined locked channel:
1. Tune to the locked channel. You will need to be in unlocked mode.
2. Press LOCK button
3. Enter the lock code.
4. Channel i snow unlocked
3. 9.4.5 Channel Skip
Channels can be ignored from certain channel tuning methods without locking by using the SKIP feature.
To Skip a channel:
1. Press SKIP when tuned to the specific channel.
2. Channel now has an "S" to the right of its name. While channel tuning, the system will skip over this channel. This skipped channel can only be accessed by direct tuning, selecting it by touching the LCD display or as a saved preset.
To remove a skip command from a channel"
1. Tune to the skipped channel.
2. Press SKIP.
3. Channel is now returned to all channel lists and the "S" is now removed.

9.5 Artist & Song Alerts
While listening to SiriusXM Satellite Radio, you can be alerted when your favorite songs or artists are playing on other channels. You can store up to 50 of your favorite Artists and 50 favorite songs.
The Infotainment Center will display and Alert message when a matching artist or song is found on another channel or you can choose either My Artists or My Songs categories to have access to all channels that have current alerts playing. When a new alert notification occurs you can choose to tune directly to it or ignore and continue listening on your current channel.
9.5.1 Setting Alerts
1. SONG ALERT
Press ADD to add an alert for a current playing song.
2. ARTIST ALERT
Press ADD to add an alert for a current playing artist.
9.5.2 Viewing & Managing Alerts
Press to cycle through your saved Song and Artists alerts. Press a third time to return to channel list.
To remove an alert select the alert to remove by touching the alert from the list. A "X" will appear to the right. Touch the "X" and the alert will be removed.
Please see page 32 to clear all alerts.


iPod and iPhone AV Interface

Camera (Optional)

Premium Remote Control (Optional)


Customer Feedback
Product Registration
Notes