Wally User Guide

Copyright Notice

Equipment Covered in this User Guide


Introduction
Welcome
Thank you for choosing DISH. You're about to experience the excitement and convenience of our Direct Broadcast Satellite (DBS) service, which delivers the very best picture and sound quality. DISH consistently provides the latest products and satellite-delivered services-with high performance, ease of operation, and a variety of entertainment options.
Conventions in This User Guide

Watching TV Now

Moving On-Screen Logo
Whenever your Wally is turned off but your TV remains on, helpful tips display on your TV screen, as shown below.

This screen assures you that your Wally is still connected to your TV. Additionally, it provides an opportunity for you to learn about your Wally and its feature.
To resume watching TV, press any button on the remote.
On-Screen Help
Quick Tips
When you press and hold INFO/HELP on the remote while viewing commonly used screens, quick tips display, such as the screen shown below.
Help App
You can access helpful information about your Wally by double-pressing  on the remote and selecting Help.

From there, you can see frequently asked questions and learn about your Wally's features.
About Satellite TV Reception
Satellite television uses satellites in a stationary orbit over the Earth to deliver television and audio programming. This type or orbit enables the satellites to stay aligned over one place on the surface of the Earth. Once the satellite dish is aimed at the satellite, the dish does not have to move to follow it.
Rain and Snow Fade
Heavy rain, snow, or dense cloud cover can reduce your satellite signal and possibly interrupt your service. Your service will return after the weather condition has passed. During installation, aiming the satellite dish to get the strongest signal will help prevent rain and snow from interrupting the signal.

Semiannual Solar Interference
Twice a year, the sun moves to a position behind DISH satellites as they orbit the Earth. This event occurs during a few days at the beginning of spring and fall, and lasts only a few minutes.
During These brief periods, you won't be able to watch programs on DISH. When the sun has moved from behind the satellites, the programs will reappear. This is an unavoidable natural event for all television involving the use of satellites and has an adverse effect on many program providers.
About Your DISH Account
If you want to know about charges to your DISH account or if you'd like to make changes to your programming packages, be sure to have your account information handy and choose one of the following options:
- Visit mydis.com/myaccount and log in to your account
- Double-press
 on the remote and select My Account, then Manage My Account.
 - Call DISH at 1-800-333-DISH (3474)
Note: Additional authorization may be required before high-definition programming and/or over-the-air digital broadcasts can be viewed; additional fees may apply.
Tips
- Use DISH Anywhere to manage your Wally when you're away from home.
- Keep your Wally connected to broadband Internet to maintain easy access to apps and pay-per-view.
- Turn off your Wally when you're not using it so that it can receive the latest software updates, which usually occur overnight.
Questions
-
I'm looking at program information in a guide that I bought at the grocery store, but nothing matches what's on my Wally. Is something wrong?
No, DISH programming may vary from what you'll find in a local publication. For best results, use the program guide on your Wally or order DISH's Hopper Magazine at dishhoppiermag.com.

Connections and Setup
Connecting to Your TV
If your HDTV or HD monitor has an HDMI connection available, this is the recommended connection to use with your Wally to provide high-definition audio and video using a single cable.
If you can't connect via HDMI, you can use standard red/white/yellow RCA cables to get picture quality in standard definition.
- Connect in one of the following ways:
- Using an HDMI cable from the HDMI port on the back of your Wp.ally to an HDMI port on your HDTV or HD monitor. For optimal picture quality, connect your Wally using a short, high-quality HDMI cable.
- Using RCA cables from the back of your Wally to RCA inputs on your TV or monitor.
2. Power on your Wally and connected TV or monitor.
3. Confirm that you're getting a TV signal from your Wally. Make sure that you're using the correct input on your TV.
Note: In most cases, connecting the HDMI cable will provide plug-and-play control of the TV or monitor's display resolution and other settings. However, your TV may require selecting a different format to display video from your Wally during its setup.
4. Turn up the volume on your TV and confirm that you have sound.
5. Consult your TV on monitor documentation for the best HD resolution that's supported. For HDTVs and monitors, this is usually 1080p/1080i or 720p.
6. Double-press  on the remote to display th Menu screen.
7. Select Settings, the TV.
8. On the TV Settings screen that displays, select Video Resolution and choose the best HD resolution for your TV or monitor. For HDTVs and HD monitors, this will usually be 1080p or 1080i.
9. Select the Aspect Ration field and choose the aspect ration that's best suited for your TV or monitor:
- 16:9 is the typical setting for a widescreen HD display.
- 4:3 with Horizontal Compression is the setting to use on a standard 4x3 TV or monitor that uses vertical compression. When viewing a 16x9 program on such a TV or monitor, it automatically displays the picture in letterbox format (with black bars across th top and bottom of the screen) to preserve the correct horizontal and vertical proportions of the widescreen HD image.
- 4:3 without Horizontal Compression is the setting to use on a standard 4x3 TV or monitor that doesn't use won't be displayed, and a widescreen HD image will appear tall and skinny.
Connecting to Broadband Internet
If you have broadband Internet access at home, connecting your Wally to your home network allows you to take advantage of pay-per-view programming, DISH apps, and DISH Anywhere.
You can connect your Wally to broadband Internet in one of the following ways:
- Wired Connection (recommended): Connect an Ethernet cable from the ETHERNET port on the back of your Wally to your home network router or switch.
- Wireless Connection: Insert the Wi-Fi USB Adapter into one of the USB ports on the back of your Wally. Visit mydish.com/order from store to order this product.
To check your connection to broadband Internet, double-press  on the remote and select Settings, then Internet. The Internet Settings screen displays the current status of your Internet connection. You have the option to view network details or reset the network.
Connecting to an Over-the-Air (OTA) Antenna
If you want to receive digital OTA channels in addition to your satellite programming, you can use the OTA USB Adapter and an OTA antenna (both sold separately). You can add the OTA channels to your Wally's default channels lists and assign them network affiliations, giving you access to the channels via the Guide or Mini Guide, just like any other channel.
Notes:
- The audio/video quality on local OTA channels depends on the distance and terrain between the broadcast station and your home, and on the placement and quality of the over-the-air TV antenna you use. If you have questions about over-the-air channels, contact your local broadcasters-not DISH.
- The type of OTA antenna that you need depends on the channels used by and the locations of the local broadcasters for your area. Visit antennaweb.org or contact a professional installer or consumer electronics retailer to help you select a suitable antenna.
Follow this procedure to watch digital OTA channels on your Wally:
1. Order the OTA USB Adapter from mydis.com/orderfromstore.
2. Install an OTA antenna in your home, making sure to follow the installation instructions correctly.
3. Connect the USB plug of your OTA USB Adapter to one of the USB ports on the back of your Wally.
4. Connect the coaxial port of your OTA USB Adapter to your over-the-air antenna. When prompted to restart your Wally, select Yes.
5. When you can view live TV again, double-press  on the remote to display the Menu screen.
6. Select Settings, the OTA Antenna.
7. On the Over-The-Air Channels screen that displays, select Scan to begin searching for channels that your OTA antenna can pick up in your area. A popup shows the status of the scan.
8. When your channel scan is complete, choose the local channels that you want to add to your program guide, then select Save. The selected channels will be added to the program guide for your Wally and will be available for live TV viewing as well as DVR recording (if you have an external hard drive connected).
Connecting to a DISH Tailgater
Th Wally supports the mobile antenna, DISH Tailgater, providing your with your satellite programming while away from home.
While setting up your Tailgater, please keep the following guidelines in mind:
- Don't stand or walk in front of the side of the Tailgater that faces the southern sky. Ensure that the handle of your Tailgater antenna is pointing north.
- If instructed during setup, contact DISH at 1-800-333-DISH (3474) to authorize your Tailgater.
- If your Wally hasn't been used for a long period of time, it may need to be re-authorized. Contact DISH at 1-800-333-DISH (3474) and follow the prompts to re-authorize your Wally. If channel 101 appears, change the channel to ensure that everything is working normally.
Follow these general steps to set up your Tailgater. For detailed information on setting up a Tailgater, please read the documentation that came with your Tailgater.
- Use the instructions that came with your Tailgater to connect and set up the Tailgater, Wally, and TV.
- Follow the on-screen prompts. If you're using your Wally for the first time, you may have to complete the on-screen installation wizard. If you're unable to complete the wizard, relocate your tailgater to a location where there are no obstructions of the southern sky.

Wally Receiver and Remote Control
Wally Receiver
Front Panel

Back Panel

Remote Control Buttons
To display your satellite programming and to use the features described below, press the SAT Mode button, located on the left side of the remote.

*Works only with a connected external hard drive. See the Recording and Watching DVR Programs chapter for more information.
Using the Remote Control
The remote control included with your Wally gives you access to all of the receiver's features. Your remote controls the Wally receiver via radio frequency (RF) signals, and as many as two other devices in the same room via infrared (IR) signals. These devices can be a TV, a DVD/Blu-ray player or VCR, and an audio device (receiver, amplifier, or accessory).
Note: IR signals travel only short distances (40 feet or less), and cannot go through walls or other solid objects. If you're using the Wally remote to control an auxiliary device via IR, you must point the remote directly at the device, with no objects blocking the line of sight.
Remote Control Modes
Basic Modes
The mode buttons for your remote control are located on its left side. These buttons allow you to switch between different devices to control.

- SAT - Press this button to control your Wally receiver.
- TV - Press this button to control your TV.
- AUX - Press this button to control a DVD/Blu-ray player, VCR, or an audio device.
- INPUT - Press this button to change inputs on your TV.
Limited Mode
While watching DISH programming, you can put your remote in Limited Mode to avoid accidentally changing inputs on your TV and seeing a black, blue, or snowy screen. When the remote is in Limited Mode, you will be able to control only the POWER, MUTE, and VOLUME functions for your TV.
Note: Limited Mode is not used with audio devices.
Turning On Limited Mode
1. Double-press  on the remote to display the Menu screen.
2. Select Settings, then Remote Control.
3. On the Remote Control Settings screen that displays, scroll down to the Advanced selection and select Limited Mode to enable it. Your change is automatically saved.
Alternate Button Functions
Most of the following button functions on the remote appear in gray text above or below the main button names. To execute the functions in gray, simply hold down the corresponding button for a few seconds until the action happens on-screen.

Remote Locator
If you can't find your remote control, simply press the LOCATE REMOTE button on the front of your Wally. In a few seconds the remote will begin to beep to help you locate it.
Note: If your remote control is out of range from your Wally or the remote's batteries are dead, you won't hear these tones.

When you find the remote control, press any button on it to stop the beeping. Then you can use the remote control normally.
Batteries
Low-Battery Warning
When you see a low-battery warning on your screen, the batteries in your remote control are low and will need to be replaced. You can also check the health of your batteries on the System Info screen by double-pressing  on the remote and selecting Settings, then Diagnostics. Alternately, you can press the SYSTEM INFO button on the front of your Wally.
Replacing the Batteries
The remote control comes with two AA batteries. When you replace old batteries, you should replace both batteries at the same time and use batteries of the same type (for example, all alkaline or all carbon zinc batteries). Alkaline batteries last longer.
Follow this procedure to replace the batteries:
1. On the back of the remote, push the tab toward the top of the remote to release the battery door latch, then lift the battery door from the remote.
2. Remove the old batteries.
3. Put in the two new AA batteries. Make sure that you match the plus ("+") ends with the plus markings.
4. Reattach the battery door.

Controlling an Auxiliary Device
The remote contains manufacturer codes for controlling up to two other devices, including your TV, DVD/Blu-ray player or VCR, and audio receiver, tuner, or amplifier. However, the remote can control more devices through IR learning.
Note: Every attempt has been made to include all manufacturer device codes. If your device brand isn't listed or if the codes listed don't work, then the DISH remote may not control your specific device. Not all of the buttons may work with some codes.
Follow this procedure to program your remote to control an auxiliary device:
1. Turn on the auxiliary device that you want to control.
2. Double-press  on the remote to display the Menu screen.
3. Select Settings, then Remote Control.
4. On the Remote Control Settings screen that displays, select Auxiliary Device.
5. Select the type of device that you want to control and select Next.
Select how you want to program the remote using one of the following options;
- Auxiliary Device Pairing Wizard (recommended) - Select the brand of your auxiliary device, select Next, and follow the on-screen instructions.
- Teach Commands - Follow the on-screen instructions. Note that the learning sequence will end when: -No button on either remote is pressed for at least 30 seconds. -The Wally remote runs out of memory for learned commands, whereupon it saves the command it has learned for equipment in this mode, exits learning, and returns to normal remote control operation. At this point, the remote cannot learn any more commands. -All the mode buttons on the Wally remote blink quickly eight times, indicating that the batteries are too low for learning. Learning ends with not learned commands saved, and the remote returns to its normal operation. -Enter Pairing Code - Follow the on-screen instructions.
Selecting Menu Options
You can select a menu option in either of the following ways:
- If the option has a number next to it, press the same number on the remote. When you use the number buttons, you don't need to highlight the option first.

- Use the arrow buttons on the remote to highlight the menu option, then press SELECT.
Exiting a Screen or Canceling a Procedure
You can exit a screen or cancel a procedure in any of the following ways:
- If you want to return to the previous screen, press BACK on the remote
- If you want to return to watching a program, press and hold BACK for a few seconds.
- Wait a few minutes until the menu closes automatically, discarding any changes you've made.
Tips
- If you don't do anything on a screen for a few minutes, the screen automatically closes. This inactivity will discard any changes you made and return you to the program you were watching.
- You can put your remote control in Limited Mode to Keep from accidentally changing the channel or input on your TV.
Questions
-
My remote doesn't control my Wally or other devices. What should I do?
- Make sure that the remote control is in the right mode and you're pointing the remote directly at your Wally or Device (e.g., TV, DVD player, audio receiver).
- Make sure that the batteries are good.

Watching TV
Using the Guide
Press GUIDE on the remote to display the Guide (program guide). The Guide can display information for programs on now and those coming on within the next nine days. The guide doesn't show programs that ended earlier in the day.
Note: The guide will display program information for the next nine days if an external hard drive is connected and your Wally can receive satellite programming from the either the 119º W or 72.7º orbital location. Otherwise, the guide displays up to two days of program information.

- Press CH
 or CH
or CH  to move a page of program data at a time, allowing your to view guide information about program on other channels.
 - Press SKIP FORWARD and SKIP BACK to move forward and backward two-and-a-half hours at a time, allowing you to view guide information about future programs for a given channel.
- Press INFO on the remote to see a screen or more detailed program information.
- Press OPTIONS to see which channel list is active: - All Channels displays all the channels. - All Subscribed displays only the channels included in your DISH package. - All Unsubscribed displays only the channels not included in your DISH package. - If you set up a favorites list, the Guide displays only the channels that you included on that list. See Channel Lists for more information.
- When certain types of programming are available within a range of channels in the Guide, the range is collapsed into one row of the guide to make it easier to scroll through programming. The range is denoted with a + sign. You can select that row to display all the channels within the range.

Searching for Programs
The Wally's predictive search feature makes it easy to find programs to watch on TV or pay-per-view.

Follow this procedure to search for a program:
1. Press SEARCH on the remote to display the Search screen. The Search screen is also accessible by double-pressing  on the remote and selecting Settings, the Search.
2. Using the on-screen keyboard, start typing a title, actor's name, or keyword. Results of your search will start to display. Typing more characters narrows the results.
3. To select a search result, press the number button on the remote that corresponds to the search result. You can also use the arrow buttons to select a search result directly.
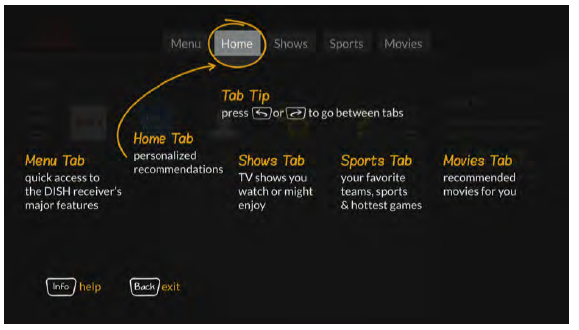
Finding Themed Programs
You can browse programs by their general theme - shows, sports, and movies.

Follow this procedure to find a themed program:
1. Press  on the remote to display the Home screen.
2. Press SKIP FORWARD or SKIP BACK to switch to a different tab at the top of the screen-Shows, Sports, or Movies. By default, results are returned only for available program listings.
3. Browse for a select a program to watch.
Using the Mini Guide
You can use the Mini Guide to see what other programs are on or coming up while not missing any oif the program you're watching.

- While watching live TV, press the RIGHT arrow on the remote, then press UP and DOWN and select a program.
- You can also enter a valid channel number using the remote's number buttons to display that channel as a selectable option.
Seeing What's Trending
You can use the Trending Live Feature to see popular programs that everyone's watching.
While watching live TV, press the LEFT arrow on the remote, then select a program or See More.
Changing Channels
Note: If an external hard drive is connected to your Wally and you're not watching a program live, changing the channel displays a popup notifying you that you'll be in live mode if you agree to the channel change.
Arrow Buttons
- While watching live TV, press the CH
 or CH
or CH  button on the remote.
 - You can also change channels the same way using the UP and DOWN arrow buttons on the front of your Wally.
Number Buttons
- Enter a valid channel number using the number buttons on the remote.
Channel Lists and Favorites Lists
Channel Lists
By default a channel list controls what you see in the Guide and Mini Guide until a favorites list is applied. You can view and change the channel list by pressing GUIDE on the remote, the OPTIONS. Below are the available channel list:
- All Channels - Displays all channels, including channels that are not in your DISH package.
- All Subscribed - Displays only the channels that are in your DISH package.
- All Unsubscribed - Displays only the channels that are not in your DISH package. To subscribe to one of these channels, call 1-800-333-DISH (3474).
Favorites Lists

Favorites lists are custom list of your favorite channels that can display in the Guide and Mini Guide so that you can see only the channels you're interested in. You can edit up to four favorites lists, adding and removing channels as you wish.
- When using a favorites list, the Guide and Mini Guide display only the channels in that favorites list. Also, when you use the UP or DOWN ARROW to change channels, the Wally skips channels that aren't on the list. Unlisted channels that are included in our current DISH package are still accessible by entering the channel number directly using the number buttons on the remote.
- You can name each of your favorites lists. By default, the four lists are named List 1, List 2, List 3, and List 4. these lists are empty unit you edit them.
Editing a Favorites List
1. Double-press  on the remote to display the Menu screen.
2. Select Settings, then Favorite Channels.
3. On the Favorite Channel Settings screen that displays, select the list that you want to edit. On the popup that displays, select Edit Channels.
4. Edit your favorites list as follow:
- Add Channels - In the NOT IN LIST column, navigate up and down and select the channels that you want to add to your favorites list. You may also enter a channel number to jump to it faster.
- Remove Channels - In the IN LIST column, navigate up and down and select the channels that you want to remove from your favorites list. If you want to remove all channels from the list, select Remove All.
Renaming a Favorites List
1. Double-press  on the remote to display the Menu screen.
2. Select Settings, the Favorite Channels.
3. On the Favorite Channel Settings screen that displays, select the list that you want to edit. On the popup that displays, select Edit Name.
4. Using the on-screen keyboard, enter the new name of your favorites list (up to eight character long).
5. When finished, select Save.
Favoriting Live TV Channels
1. When watching love TV, press OPTIONS on the remote.
2. On the TV Viewing Options popup that displays, select the Favorite tile.
3. On the popup that displays, select the list(s) that you want to add this channel to.
4. When finished, select Save.
Applying a Favorites List
1. Press GUIDE on the remote to display the Guide.
2. Press GUIDE again to display the Guide Options - Favorite Channels popup.
3. Select the favorites list that you want to apply.
Note: If you want to edit a favorites list, select Favorite Settings.
TV Viewing Options
While watching a program, you can access TV viewing options quickly by pressing OPTIONS on the remote to display the TV Viewing Options popup, shown below.

Tips
- When you're watching a program or have one selected on the Guide, you can get more information about the program by pressing INFO on the remote.
- Press and hold BACK on the remote to exit almost any menu screen and return to watching your program.
Questions
-
How can I customize my program guide?
-Set up a favorites list. See Favorites Lists for more information.
- While viewing the guide, press OPTIONS on the remote and select a different channel list. See Channel list for more information.
- Change the order in which the channels display by following the Editing a Favorites List procedure.
-
Why does my program guide show only two days of programming?
- You don't have an external hard drive connected to your Wally. See DVR Functionality with Your Wally.
-Your Wally may not be obtaining a signal from the necessary orbital locations. See the Favoriting Live TV Channels chapter to see if you're receiving a proper signal.
-
Why are channels missing from my program guide?
-Parental controls may be set to lock or hide the channels. See the Parental Controls chapter for more information.
- Your program guide may be displaying channels that aren't in your DISH package. Press GUIDE on the remote to display the program guide. Then press OPTIONS and select All Subscribed or All Channels.
-Your program guide may be displaying channels in a favorites list. Press GUIDE on the remote to display the Guide and display the default favorites list. Press GUIDE again to highlight the next available list. You can also choose to edit your own favorites list. See Favorites Lists for more information.

Watching Pay-Per-View Programs
DISH Pay-Per-View
DISH Pay-Per-View allows you to instantly watch movies and other exciting events on your Wally for a rental fee. Even if you don't have a connected external hard drive, you can use your remote control's playback buttons to control your viewing experience, just as yu would when pausing or reversing a DVR program.

To order pay-per-view using your remote, your Wally must be connected to broadband Internet service. If it's not, you can order a pay-per-view program by logging int to your DISH account at mydis.com/myaccount and selecting Order Pay-Per-View.
Visit mydish.com/ppv for more information on DISH Pay-Per-View.
Ordering Considerations
Keep these important considerations in mind before ordering a pay-per-view:
- Once you confirm an order for a pay-per-view program, you cannot cancel the order; you'll be billed for it.
- You cannot record certain pay-per-view programs.
- An All Day DISH Ticket for a program is available for up to 24 hours and runs from the first showtime (5 a.m. ET) to the same time the following day (5 a.m. ET). If you record a program from All Day DISH Ticket, you can watch the rental for up to 24 hours from the first viewing.
- Replays of some pay-per-view programs or events are separate, and you may be billed for each viewing.
- You can use parental locks to restrict your family from watching pay-per-view programs. See the Parental Controls chapter for more information.
- You can review what you've rented during the pas 30-60 days by viewing the Recent Purchases screen. Double-press
 on the remote, select My Account, then Recent Purchases. The program titles that you've ordered will appear on your next DISH bill.
Ordering Pay-Per-View

Recording Pay-Per-View

Tips
- Keep your Wally connected to broadband Internet so you can easily order pay-per-view programming with your remote control.
- You can connect an external hard drive to the USB port on the back of your Wally to record pay-per-view programs. Se
- e the Recording and Watching DVR Programs chapter for more information.
Questions
- Why doesn't my program guide show any pay-per-view channels?
-Your program guide may be displaying channels that aren't in you DISH package. Press GUIDE, then OPTIONS, and select All Subscribed.
-Parental controls may be set to lock and hide pay-per-view channels. See the Parental Controls chapter for more information.
- Why are some pay-per-view programs blacked out?
Sporting events and other programs are sometimes blacked out because of local broadcast restrictions. Note that the provider of such programming determines these restrictions - not DISH.
- Why did my all day pay-per-view programs shut off while I was watching it?
The all-day events run from 5 a.m. ET to 5 a.m. ET the next day. You should ensure that you can finish watching an event that you've ordered by this time.
Recording and Watching DVR Programs
DVR Functionality with Your Wally

Setting Up an External Hard Drive (EHD)

Recording a Program

Recording Live TV
To record a live program from the point where you're watching:

To record a live program from the point where you started watching:

To stop recording a program:

Recording a Future Program

Resolving Recording Conflicts

Event Timers

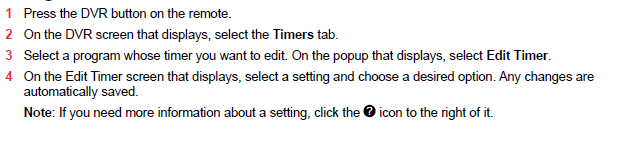
Editing an Event Timer
DVR Schedule

Playing a Recording

DVR Playback Controls


Managing Recordings
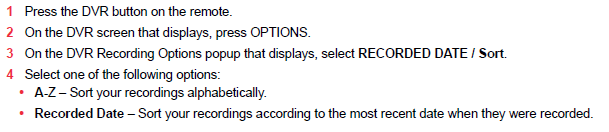
Grouping and Sorting Recordings
Deleting a Recording

Restoring a Deleted Recording

Using DISH Anywhere

Tips

Questions


Apps
Using Apps on Your Wally

Tips


Parental Controls
Parental Locks and Ratings Restrictions

Parental Control Rules

Creating or Changing the Parental Passcode

Changing Parental Controls

Ratings Systems
Movie Ratings


TV Ratings


Content Labels of TV Ratings

Tips

Questions


Customizing Your Wally
Changing the Channel Order

Changing DVR Timer Defaults

Enabling Closed Captioning

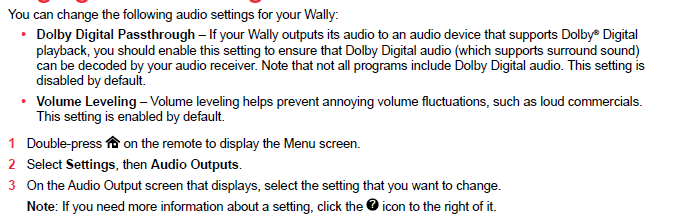
Changing Audio Settings
Changing the Alternate Audio Language

Getting Receiver Updates

Resetting to Factory Defaults

Tips

Questions


Troubleshooting
Quick Fixes for the Most Common Issues

Troubleshooting Tools

Resetting Your Wally

Checking Your System Status

Running Check Switch

Other Help Resources

Troubleshooting Tables

Message Numbers


Changing Channels

Favorites Lists

Guide and Mini Guide

Hearing a Program

Menus

Parental Locks

Purchasing a Pay-Per-View Program

Recording and Event Timers


Remote Control

Watching a Program


