Splendide Washing Machine Use and Care Guide
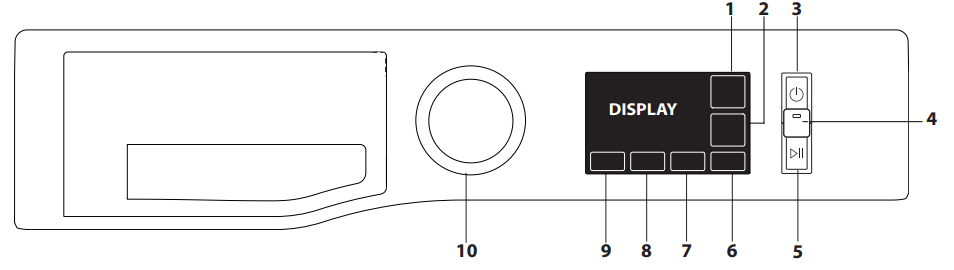
Operating Instructions
 |
|
| 1. SUPER WASH / MUTE button | 6. EXTRA RINSE button |
| 2. POST CYCLE CARE / KEY LOCK button | 7. DELAY START button |
| 3. ON/OFF button | 8. SPIN button |
| 4. PREWASH button and indicator light | 9. TEMPERATURE button |
| 5. START/PAUSE button | 10. WASH CYCLE SELECTOR KNOB |
Wash Cycle Table

| Product Description | |
| 1. Top |  |
| 2. Detergent dispenser drawer | |
| 3. Control panel | |
| 4. Door handle | |
| 5. Porthole door | |
| 6. Drain pump (behind the cover panel) | |
| 7. Cover panel | |
| 8. Adjustable feet (2) | |
Detergent Dispenser Drawer
- compartment 1: Pre-wash detergent (powder)
- compartment 2: Detergent for the wash cycle (powder or liquid) If liquid detergent is used, it is recommended that the removable plastic partition A (supplied) be used for proper dosage. If powder detergent is used, place the partition into slot B.
- compartment 3: Additives (fabric softeners, etc.) The fabric softener should not overflow the grid.
- extra compartment 4: Bleach
NOTE: Splendide recommends using 1 to 2 tbsp. of a bio-friendly fabric softener, or similar brand per wash load. These softeners tend to appear light in color and dissolve more quickly in less water, minimizing build-up within your machine.
NOTE: Use powder detergent for white cotton garments, for pre-washing, and for washing with hot temperatures.
NOTE: Follow the instructions given on the detergent packaging.
Bleach Cycle
Bleaching may only be performed in conjunction with wash cycles “Whites”. If desired, pour the bleach into extra compartment 4; pour the detergent and softener into the corresponding compartments, then select one above mentioned wash cycle. This option is recommended only for sturdy fabrics such as cottons, linens, etc...
NOTE: At the end of the cycle, there may be water standing in the bleach or other compartments, this is NORMAL. The Bleach compartment can be removed when not in use.
NOTE: Bleach & Prewash cannot both be used in the same cycle. If desired, you must choose only one of these options.
Wash Cycles
NOTE: The machine remembers your last option selection for Temperature, Spin Speed, and Post Cycle Care, and will use it for future wash cycles until you deselect that option i.e. if temperature is changed from the default setting on the Regular wash cycle, the machine will use that modified setting next time a Regular wash cycle is selected. To restore factory defaults for Temperature and Spin Speed, refer to the WASH CYCLE TABLE.
Whites
- Use this cycle when using liquid chlorine bleach. Pour the bleach, the detergent and the additives into the relevant compartments.
Colors
- This cycle is intended for use with colored fabrics, including cotton and synthetic garments.This cycle is designed to use less hot water, and is suitable for lightly soiled garments.
Regular
- Suitable for washing normally soiled cottons and linens.
Express
- This wash cycle was designed to wash lightly soiled garments quickly. By selecting this wash cycle (“Express” at WARM temperature), it is possible to wash different fabrics together (except for wool and silk items).
Perm Press
- This cycle has less mechanical agitation and lower spinning speed designed to reduce wrinkles.
Quick Wash
- This wash cycle was designed to wash lightly soiled garments quickly. By selecting this wash cycle (“Quick Wash” at WARM temperature), it is possible to wash different fabrics together (except for wool and silk items).
Lightly Soiled
- This wash cycle was designed to wash lightly soiled garments quickly. By selecting this wash cycle (“Lightly Soiled” at WARM temperature), it is possible to wash different fabrics together (except for wool and silk items). For this cycle we recommend pretreating stains, shirt necks and wrists with specific anti-stain products. This cycle is also used for winterization. Refer to the RV/MARINE WINTERIZATION section for details.
Active Wear
- Is for washing lightly soiled sports clothing fabrics (tracksuits, shorts, etc.); for best results, we recommend not exceeding the maximum load indicated in the “Wash Cycle Table”.
Jeans
- Turn garments inside-out before washing.
Delicates
- For washing very delicate garments. It is advisable to turn the garments inside out before washing them.
Wool
- For washing wool garments. For best results, use special detergents and do not exceed the maximum recommended load indicated in the “Wash Cycle Table.
Silk
- Use special wash cycle to wash all silk garments. We recommend the use of special detergent which has been designed to wash delicate clothes.
Clean Washer
- This cycle uses a higher water volume in combination with regular liquid chlorine bleach to thoroughly clean the inside of the washer. Do not use thickened or splash-less bleach for this cycle. When using this cycle, the drum must be empty.
Rinse + Spin
- Rinses and then spins. For resilient garments.
Spin + Drain
- Spins the load then empties the water. For resilient garments. If you exclude the spin cycle using the button, the machine will only drain.
Cleaning & Maintenance
Cleaning the outside of the washing machine
The outer parts and rubber components of the appliance can be cleaned using a soft cloth soaked in lukewarm soapy water. Do not use solvents or abrasives. Do not use glass or general purpose cleaners, scouring powder or similar to clean the control panel - these substances might damage the surfaces.
Cleaning the inside of the washing machine
The washing machine has a “Clean Washer ” cycle for its internal parts; it must be run without any load in the drum. To optimize this cycle, use regular liquid chlorine bleach. Pour bleach into both the softener compartment and the extra bleach compartments, filling both to their respective max fill levels. Do not use thickened or splash-less bleach as excess suds may occur.
Caring for the door and drum
Always leave the porthole door ajar in order to prevent unpleasant odors from forming. For better care, periodically wipe the entire inside of the door with a damp cloth, and also inspect the gray-colored seal between the door opening and the drum for buildup. Wipe the seal clean using a damp.
Checking the Water Supply Hose
Check the inlet hose regularly (at least once per year) for brittleness and cracks. If damaged, replace it immediately. During the wash cycles, water pressure is very strong and a cracked hose could easily split open. If the inlet hose has a transparent coating, periodically check if the color intensifies locally. If yes, the hose may have a leak and should be replaced.
Cleaning the Mesh Filters in the Water Inlet Valves
- Close water tap and unscrew the inlet hose. NOTE: Never use second-hand hoses.

- Now unscrew the inlet hose on the back of the washing machine by hand. Wipe any debris off of the mesh filter on the water inlet valve with your hand or using a squirt bottle to flush it out with water.

- Attach one inlet hose to the water faucet. Screw on coupling by hand until it is seated on washer. Use pliers to tighten couplings an additional two-thirds turn. Turn on that hose's respective water supply, and check for leaks. Tighten if necessary. Repeat this step with the second inlet hose. Both inlet hoses must be connected for washer to work properly.

Cleaning the Detergent Dispenser

Remove the dispenser by rotating out to fully open position and then pulling it out (see figure). The drawer will slide on the handle.
You may find some residue buildup in or behind the washer’s dispenser. Wipe the surfaces with a damp cloth and towel dry. Use an all-purpose surface cleaner, if needed.
Replace the dispenser by sliding it back onto the handle and make sure that it is correctly seated.
Cleaning the Water Filter/ Draining Residual Water
- Remove the cover panel: Using a screwdriver, do that which is shown in the following figure.

- Container for the drained water: Place a low and wide container under the water filter in order to collect the residual water.

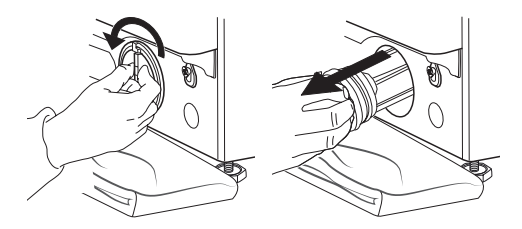
- Drain the water: Slowly turn the filter counter-clockwise until all the water has come out. Allow the water to flow out without removing the filter. Once the container is full, close the water filter by turning it clockwise. Empty the container. Repeat the procedure until all the water has been drained.

- Remove filter: Lay a cotton cloth beneath the water filter, which can absorb a small amount of rest water. Then remove the water filter by turning it out anticlockwise.
- Clean the water filter: remove large clumps of lint by hand from the filter and place lint in a suitable waste container. Remove remaining residue from the filter by rinsing with water.

- Insert the water filter and reinstall the cover panel: Reinsert the water filter again by turning it in clockwise direction. Make sure to turn it in as far as it goes; the filter handle must be in vertical position. To test water tightness of the water filter, you can pour about 1 liter (0.22 gal) of water into the detergent dispenser. Then reinstall the cover panel.

Troubleshooting
| Anomalies | Possible Causes/ Solution |
|
The washing machine does not switch on. |
The appliance is not plugged into a grounded 3 prong outlet, or not enough to make contact. |
| The outlet does not have power. | |
|
The wash cycle does not start. |
The washing machine door is not closed properly. |
| The ON/OFF button has not been pressed. | |
| The START/PAUSE button has not been pressed. | |
| The Delay Start button has been activated. | |
| The START/PAUSE button is activated by holding the button for a specific period of time (2 seconds). If you hold the button for too long, or too short of a time, the cycle will not start. | |
|
The washing machine does not fill with water or fault code (F8E1) appears on the display. |
The water tap has not been opened. |
| The water inlet hose is not connected to the tap. | |
| The hose is bent. | |
| Use the water supply hoses provided with the machine. If flood-safe hoses are used, it may restrict the flow of water. | |
| The water pressure is too low. | |
| The water inlet valve strainer may be plugged. | |
|
The washing machine continuously loads and unloads water. |
The drain hose is not fitted between 25 and 34 inches from the floor. |
| The free end of the hose is immersed in water. | |
| The drain pipe fits too tightly in the standpipe, or it is taped to the standpipe. The drain hose should be loose yet fit securely. Do not seal the drain hose with tape. The hose needs an air gap. | |
|
The washing machines does not drain and the fault code (F9E1) appears on the display. |
Clean the pump filter (see Cleaning and Maintenance chapter). |
| The drain hose is bent. | |
| The drainage duct is clogged. | |
|
The washing machine vibrates a lot during the spin cycle. |
Transport bolts have been not removed correctly during installation. |
| The washing machine is not leveled. | |
| The washing machine is tucked between furniture cabinets and the wall. Add some space on either side of the machine. | |
|
The washing machine leaks. |
The water inlet hose is not screwed on properly. |
| The detergent dispenser drawer is obstructed. | |
| The drain hose is not properly attached. | |
| The rubber washer (gasket) in the inlet hose is damaged. | |
| The display visualizes an error code (e.g.: F1E1, F4...). | Switch off the machine and unplug it, wait for approximately 1 minute and then switch it back on again. |
|
There is too much foam. |
The detergent is not suitable for machine washing (it should display the text “for washing machines” or “hand and machine wash”, or the like). |
| Too much detergent was used. | |
| Use only HE detergent. | |
| The display shows cL. | Run a Clean Washer Cycle . The machine will prompt you to run a clean washer cycle every 30 cycles. Refer to the CLEANING & MAINTENANCE section for instructions on how to run this cycle prop |
| The display shows fault code F0E7. | Remove any clothes load during the Clean Washer cycle. The Clean Washer cycle will not run if there are any clothes inside the drum. |
| Display shows “--:-- --” at the end of the cycle. | This is normal behavior. If the machine takes longer to finish a cycle than displayed, then “--:-- --” will momentarily appear before the end of the cycle. The cycle may take longer due to redistributions required for an unbalanced load. |
| Water level appears low during wash. | This is normal for an HE front-load washer. The washer senses load size and adds the correct amount of water for optimal cleaning. |
|
Access door won’t open. |
Door lock may be activated due to high water level. Run a Spin + Drain cycle to drain out the water. |
| Power may have been lost. Ensure the machine is powered. You may unplug and then plug the machine back in. | |
|
Washer takes longer time than shown on the machine’s display. |
Water pressure is too low. |
| Voltage supplied to the machine is too low. | |
| Excessive foam. | |
| An unbalanced load may cause the machine to adjust multiple times before performing a spin. |